![[2022 GUIDE] THE BEGINNER’S GUIDE TO CAR DETAILING (LIKE A PRO)](https://macdetailz.com/wp-content/uploads/2022/08/iStock-1203273850-1024x683-1-1024x500.jpeg)
For most people, the act of cleaning a car feels more akin to a chore than an accomplishment. Labor intensive, time consuming, and tedious as all hell, cleaning a car top to bottom is often likened to punishment than pleasure.
As with any “detail-oriented” endeavor, knowing where to start and actually setting the time aside to thoroughly clean every crevice of an automobile is oftentimes the hardest part. Which is precisely why we’re here to help.
It’s time to get up, off your ass, and over to that mode of transportation for an intense scrubbing session. Being that we’re in a bit of a giving mood today, we’ve taken the time and put together a simplified DIY guide of sorts. A way in which one can learn how to properly detail a vehicle via a series of logical steps, all accompanied by a series of tips and forewarnings designed just for beginners.
That said, today we’ll be focusing exclusively on deep-cleaning the exterior of an automobile, and we’ll save the whole interior detailing discussion for another article. This way, we can keep both guides as informative and focused as possible, and in turn, you can can have a spotless vehicle in record time. So let’s get cracking!
DETAILING BASICS, AND THE ZEN ART OF CAR CARE
For certain car enthusiasts, the deep-cleaning act of car detailing is equal parts DIY puzzle and Zen ritual. An OCD obsession with perfection, that goes well beyond showroom levels of cleanliness, by transcending the realm of gridlocked interstates and road grime, for the sensation of raking a Japanese rock garden, or pruning a 200 year-old bonsai tree.
Much like the art of bonsai and Japanese rock gardening (枯山水, karesansui), there are multiple levels of difficulty and reward when it comes to auto detailing. While almost every form of hands-on, detail-oriented work comes with a vast array of varying techniques and theories as to what works best and why, car detailing is unique in that it can be easily augmented by chemical products.
These products often tend to be just as unique and numerous as the techniques that are used by the people who apply them. Ask three professional detailers what products to use, and which application and removal techniques work best, and you’ll likely get three very different answers. Which leads us to the first big question that deserves answering…
WHAT IS CAR DETAILING?
Automotive detailing is a fairly a self-explanatory procedure, in that it involves a “detailed” cleaning process, oftentimes accompanied by the restoration of damaged components. Externally, detailing helps protect paint, glass, and body parts form harmful UV rays, contaminants, and damage stemming from driving.
Today, the detailing business has become a multi-billion dollar industry, with the economic pistons pumping beneath its bonnet consisting of thousands of unique detailing products, all with their own unique genetic backbone, sales approach, and market distribution. To put the magnitude of this operation into scope, in the United States alone, the auto detailing market was valued at $10.3 billion USD in 2020, and that’s after taking a massive hit due to COVID-19.
DETAILING A VEHICLE’S EXTERIOR
When someone decides to detail their vehicle, they’ll likely follow these general guidelines:
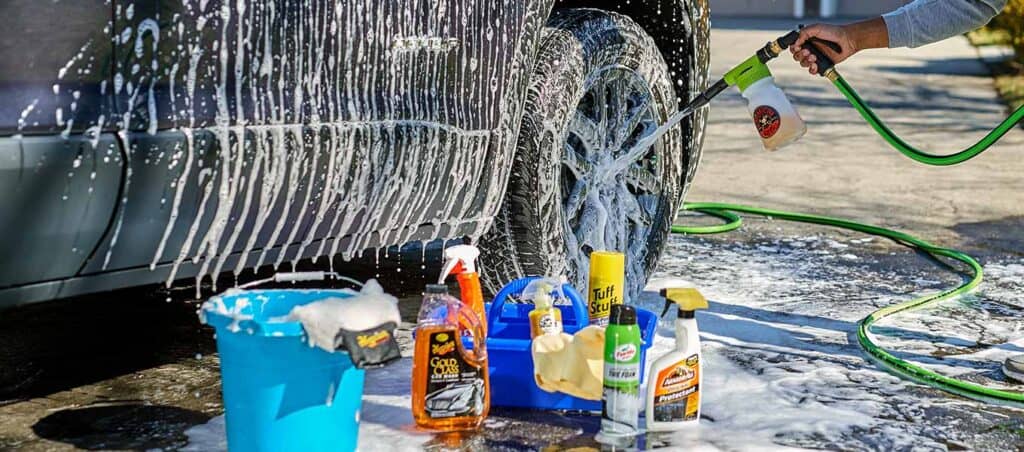
- Clean the Exterior: When detailing a vehicle, the first step should always involve a thorough cleaning with quality detailing products, and a trusted source of water. This not only guarantees that any dirt, debris, road grime, pollen, or other form of surface gunk is removed, but it also exposes any serious issues that may be lurking beneath the surface. For this step, car owners should use a microfiber towel or wash mitt, along with a low pH car wash shampoo to reduce the risk of scratching or marring the surface.
- Protect the Exterior: While a thorough car wash is crucial for removing surface debris, car detailing goes beyond a solid scrub-down, as it typically involves the application of surface protectant coatings. Car wax, paint sealants, clear bras, tire dressing, ceramic coatings, vinyl wrap, paint protection films, and any other number of protective product are yours to use. Other exterior parts such as tires are enhanced with tire dressing. A lot of people also use glass cleaner to clean automotive glass.
Quick Tip: When it comes time to tackle an exterior detailing procedure, you can opt to either buy an all-in-one DIY detailing kit, or piece together your own custom setup via the purchase of individual car cleaning products.
Prepping the car paint by using a clay bar is usually the first step of protecting the paint.
Car detailing experts recommend cleaning the wheels first with wheel cleaner and tire and wheel approved brushes.
Many car owners think that replacing their air fresheners or spraying on a tire shine is all you need to do to detail the car. Sure, you could go all-in, and purchase some high-end car wash brushes, various types of synthetic car wash shampoos, and a heavy duty pressure washer, but these products alone won’t guarantee amazing results. The world’s best car detailing pros all agree that in order to get an automobile to look immaculate, one must not only have the right tools, but a hyper-focused work ethic, plenty of patience, and a shit-ton of practice. Having a cold six-pack handy never hurt either.
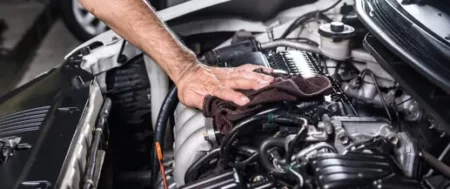
BEGINNING THE CAR DETAILING PROCESS
Serious car washer leaning over a light motor vehicle
Detailing a car isn’t a particularly difficult task. Yet even the act of washing a vehicle holds the potential of casing great harm if one follows the wrong procedures or uses the wrong products. But knowing the necessary steps and what products work best is just half the battle.
For instance, if you own any towels, mitts, or any other car cleaning fabric or sponge-like material that is not microfiber, you might want to to throw them out. The trash bin is the only place for products that leave scratches on vehicle surfaces. Remember, we’re trying to restore a vehicle’s exterior to its original state here, not slap a shit-ton of scratches and swirl marks on its ass, like some salary man leaving the dominatrix dungeon.
Now that we’ve dropped that little nugget of knowledge on you, it’s time to turn to another one of the most important thing you can do to keep your car’s finish looking like new: Wash it regularly. And do it the right way.
Contaminants like dirt, mud, road grime, bird turds, bug guts, pollen, deicers, and and sap all slowly seep into a car’s clear coat if allowed to sit for too long. Being lazy is only going to hurt you in the long run, so scrub that machine down once a week if possible, and remember the following six golden rules of car washes.
- Never wash your car in direct sunlight. Almost all detailing products will perform poorly in direct sunlight or on a hot surface. Heat also speeds-up the drying of soap and water, which translates to stubborn water spots and streaks. Always work indoors or in the shade, and only when all of the vehicle’s exterior surfaces are cool to the touch.
- Avoid cross-contamination. Cross-contamination during a car wash occurs when you use the same materials for every stage of the cleaning process. So don’t use the same items (towels, brushes, buckets, water, etc.) for multiple purposes or areas of the automobile. The reasoning here is that you don’t want to move contaminants from one part of the vehicle to another, or use a filthy microfiber mitt to scrub a relatively clean section. This is particularly important to remember when tackling extra dirty areas like wheels, lower rocker panels, bumpers, and exhaust ports.
- Use the two-buckets-and-a-beer technique. While dumping your water often, and not using the same cloth or mitt for every surface will help cut down on cross-contamination, using the two-buckets-and-a-beer approach is just as crucial. By having one bucket for rinse water, and one for sudsy H2O, you create a safe place for dunking that filthy sponge between scrubs, which in turn helps keep that bucket of soapy shampoo free from contaminants. The beer is there for moral support.
- Work your way from the top down. The lower portions of an automobile come into close contact with road contaminants, and you don’t want that filth to spread to the vehicle’s far more pristine upper portions. That said, it’s generally a good idea to hit your wheels and tires first, but not with a scrubbing session and soap. Use a trusted spray-on and rinse-off chemical that is approved for the type of wheels you roll atop, as it will allow the filthiest part of the car to get hit with a concentrated blast. After that, wash the car from top-to-bottom, saving the wheels and tires for last, using a different scrubbing media for their surfaces to avoid cross-contamination.
- Always use lubrication. Our naughty bits aren’t the only things that enjoy a little lubrication when friction is involved. Outside of a gentle wipe-down with an ultra-plush microfiber dusting cloth, vehicle paint and clear coat require something slippery to prevent marring.
- Get the right supplies and towels. As we previously mentioned, using sponges and traditional cloth wash towels on a vehicle’s exterior is akin to breaking out some 120-grit sandpaper in the shower. It’ll exfoliate alright, but at what cost? Get yourself a proper wash-mitt and make the marginal investment in some plush microfiber towels, for cleaning and drying your car, as both of these items will greatly reduce the risk of scratching the surface. While you’re at it, go ahead and order a pH balanced car shampoo too, because while household dishwashing liquid does a number on bacon grease, it will royally fuck-up a car’s clear coat.
Quick Nerd Note: Car detailing is just as much about protection as it is about shiny surfaces and dust-free interiors. Routine hand washing is but the first step in the ever expansive ascent to preserving the appeal of an automobile. Keep this in mind, for even detailing black cars requires unique care.
A FEW MORE MUST HAVE SUPPLIES, AND THE REAL COST OF PRO DETAIL JOBS
Now by this point, you’re probably saying, “I gotta do all that every time I want to wash my damn Datsun?! Why can’t I just take my car down to the local car detailing pro?”
Sure, you could take your car over to that professional detailer, and they will more than likely give that ride the shine it deserves. This method actually makes a lot of sense if you are planning on selling the vehicle, or only drive it on occasion, after which you park it in a spotless garage.
But unless you are completely loaded, the price of professional car detailing is going to add-up real quick. Pricing also varies depending upon the size of the vehicle in question, and the level of detailing required. For example, a basic detailing service on an average-sized sedan is going to set you back anywhere from $75-150, whereas larger vehicles are typically in the $125-250 range for the same service.
If you were to detail these exact same vehicles at home, you would likely spend under $100 for all of the materials and tools, and that includes high-end interior and wheel cleaning products. This may seem substantial, but keep in mind that you’ll be able to reuse these products and tools over and over, and by doing so frequently, will make the process far less intensive over time.
We’ve put together the following list of must-have car detailing items for beginners, which can be modified or substituted to taste. Remember, it’s your ride and your money, so choose what you feel is best suited for your automobile.
Here’s what you’ll need:
1 bottle of low pH car wash shampoo $10
2-4 wash mitts $12
2 large buckets $10
12 premium microfiber towels $16
1 claybar or clay mitt $15
1-2 bottles of ceramic coating $70-140
Quick Nerd Note: Detailing a Porsche in Portland is going to be quite a bit different than scrubbing a Chevelle in Cincinnati. Every area of the world has its own unique contaminants, water sources, and environmental concerns that can impact the way in which a car becomes filthy, and in how it is subsequently cleaned.
TIPS FOR FINDING THE BEST CAR DETAILING SUPPLIES
As we stated above, simply taking your vehicle to the car wash is not going to cut the kimchi, especially if you’re trying to detail it like a badass. Car detailing requires acquiring the right car care and detailing tools, as many of them are specifically designed to clean, restore, and enhance a specific aspect of an automobile. To obtain these highly necessary items, you’ll want to either purchase a detailing kit, or complete an “à la carte” approach.
The tricky part is determining what supplies are best, especially when price points and copious amounts of online reviews are brought into the equation. By this point, you might be thinking, “Wait. Aren’t all microfiber towels, wash mitts, and tire dressing products the same?” The answer you shall soon discover, is both a resounding “yes” and a defiant “no.”
There are multiple standout brands in the car detailing arena, with companies like Chemical Guys, Meguiar’s, Turtle Wax, Mother’s, and more jostling for the all-mighty automotive cleaning throne. However, finding the right clay bar, buffing pad, drying towel, wash mitt, shampoo, or any number of other car care product is going to require a little bit of legwork on your end.
Generally speaking, you’ll want to focus on the following two categories when it comes to detailing the exterior of an automobile:
- Vehicle Exterior Detailing Supplies
- Wheel and Tire Cleaning Supplies
The Key to Buying Quality Exterior Car Cleaning Supplies
While it might seem logical to purchase your auto detailing supplies from the auto parts store down the street, the brick-and-mortar method is not always the best idea. The same can be said for heavy duty car cleaning products, for oftentimes, a gentle approach returns the greatest results.
Purchasing the right car detailing supplies doesn’t mean buying the first thing you see at the auto parts store that’s advertised to “Kick Ass, or Your Money Back!” Instead, it means taking the time, and researching the ever loving shit out of a series of competing products in order to determine which one works best. Something that’s going to remove road grime and hard to penetrate items like bug splatter and baked-on bird shit, but not eat into your clear coat or scratch the surface. Buying the best means researching the rest, because you don’t want to be that nincompoop that just stripped half of his clear coat off by using the wrong product.
HOW TO WASH YOUR VEHICLE THE RIGHT WAY
Contrary to common belief, you don’t necessarily have to wash your vehicle every week. Every time you set out to scrub your automobile, the chance of damaging its exterior surfaces increases exponentially, especially if you are new to the whole hand-wash approach, or are using the wrong approach. Naturally, this has quite a bit to do with how filthy your vehicle gets on a weekly basis, as well as what sort of driving environment it encounters when in operation.
Disclaimer complete, here’s a general rundown of what needs to happen in order for that ride of yours to get a safe scrubbing.
Step 1: Get Your Shit Together
Cleaning accoutrements acquired and inventoried, move everything you plan on using to the area where the vehicle will be cleaned. By this point your two-buckets-and-a-beer setup should be ready, with the first bucket being set aside for rinsing the dirty wash mitt or cloth, and the second, soapy H2O solution, being reserved for dunking. (We suggest cracking open that beer at this point to guarantee adequate human hydration as well.)
You’ll also want to make sure that you have a plethora of microfiber cloths on hand, two or three wash mitts, a gentle scrubbing brush for the wheels and tires, and a garden hose with a sprayer wand. It’s also a good idea to make sure that you are using a neutral water source, because using the wrong tap water can cause all kinds of harm. If you are unfamiliar with this “soggy subject,” be sure to read our blog article pertaining to the topic of reducing the risk of contaminated water spots prior to proceeding.
Quick Tip: Remove any accessories on your person that may scratch or damage the vehicle’s various surfaces. This means belts, long necklaces, bracelets and watches, rings, fanny packs, chastity belts, and monocles should all be removed prior to detailing the vehicle.
Step 2: Spray It Like You Mean It
Spray your vehicle with water until any visible debris, pollen, bird poo, or other form of filth has been rinsed away, always remembering to avoid direct sunlight at all costs. You’ll also want to spray the entire automobile in one session, beginning with the top and working your way downward. The only time you would start on a lower portion of the vehicle would be if its wheels and tires were extremely filthy, at which point you would blast those first to prevent grime from splattering onto freshly rinsed surrounding areas.
Unfortunately, this initial rinse stage is often neglected as many people will rush straight to the scrubbing, which results in surface contaminants being pushed across the clear coat and glass, thus causing significant surface damage. A quick spray-down will help minimize the development of swirl marks and scratches.
STEP 3: HIT THOSE ROLLERS AND RUBBER FIRST
Wheels and tires tend to be the dirtiest part of a car due to all of the asphalt grime, road salt, brake dust, mud, and various other forms of contaminant coming into close proximity to their rotating surfaces. This is why it is imperative that you clean all four of these corners first, especially if the vehicle has not been detailed in a while, or if you have just returned from a hardcore 4×4 mud-slinging adventure.
Simply apply a spray-on, rinse-off tire and wheel cleaner. And after letting the stuff sit for the recommended period of time, hose everything off before scrubbing your tires in a circular motion to remove any stubborn grime. Here, a sudsy wheel sponge or brush will help, especially if it is smaller, and allows you to access hard-to-reach areas within the alloy wheel itself.
Quick Tip: Always rinse-out your wheel wash bucket thoroughly before using it for another area of the automobile regular wash. Wheel and tire contaminants are typically the filthiest stuff you will find on an automobile outside of engine bay grime and undercarriage contaminants.
Step 4: Two-Buckets-and-a-Beer Time!
After dumping the manufacturer’s recommended dollop of car shampoo into one of the buckets, run water in both it, and your rinse bucket, all while sipping on your favorite brewskie. Once filled, break-out the wash mitt or microfiber cloth you plan on using, and follow these simple steps.
- Spray the entire vehicle with water to guarantee that all surfaces are devoid of loose contaminants.
- Soak the wash mitt or cloth in the soapy water solution Once fully saturated, wring it out over the surface you wish to scrub. This acts like a pre-soak, adding further lubrication to the surface, and allows the shampoo to loosen any gunk stuck on the surface.
- After the entire area is coated in sudsy water, begin scrubbing the vehicle, focusing on one section at a time. Remember to always start with the roof and work your way down, routinely dunking your mitt in the rinse bucket as you go to remove contaminants, before absorbing more sudsy water as needed.
- As you scrub, be sure to wash in straight, overlapping lines, as opposed to circles, which can cause swirl marks to surface. Be gentle during this first pass, as you will likely pick-up a shit-ton of debris during this initial scrubbing session, and you want to avoid grinding it into the glass or clear coat.
- Depending on how filthy the vehicle is, you may notice that the water in the rinse bucket has become cloudy, or tainted with grime rather quickly. If this is the case, throw the contaminated water out and refill the bucket with clean water. It is not a bad idea to inspect the quality of the soapy H20 bucket as well, because even with a preliminary rinse bucket in play, deeply embedded contaminants can still end up in this sudsy solution.
- After one section or body panel is scrubbed, rinse it off with the hose or pressure washer before moving on to the next area. Be sure to move quickly to prevent the soap from drying out, and as you rinse, use a top to bottom approach. By keeping the entire vehicle wet at all times, you will prevent water spots from forming, and soap residue from hardening on the surface.
- First scrub and rinse session complete, you will be able to ascertain what stubborn spots will require some additional “coaxing” in order to be safely lifted from the surface. While some people swear by the quick and easy chemical “bug and tar remover” method, others insist that taking the slow and soapy approach is safest. Whichever technique you choose, be sure to take care when dealing with sticky, or deeply embedded contaminants, for this is when surface marring often occurs during the detailing process.
- Stubborn stains and debris safely lifted, dump the water out of both buckets, rinse your wash mitt or towel, and repeat the entire top-to-bottom scrub down procedure one more time with fresh soap and water in each bucket. This second pass will help guarantee that any missed areas are covered, because chances are there are a handful of spots that were either untouched, or require additional attention.
Quick Tip: It’s not a bad idea to occasionally blast your wash mitt or microfiber cloth with fresh water from your garden hose or pressure washer during the scrubbing portion of a detailing project. This will help guarantee that contaminants do not compromise the quality of your soapy water, or worse yet, end-up back on your vehicle’s exterior.
STEP 5: DRY IT UP!
Shot of a happy young man cleaning his car with microfiber cloth on a sunny day.
Yes, drying has its own step, and no, we’re not talking about hauling ass down the highway in a grandiose attempt at air-drying your 1991 Buick Century. We don’t give a shit what your automotive shampoo’s label says, watermarks and streaks are bound to materialize if you allow a vehicle to fully air dry. Sure, some people will boast about using compressed air or a leaf blower, but they always follow this water dispersing technique with a thorough microfiber wipe-down, knowing full-well that this process will likely require more than one fluffy towel.
Once complete, this wipe-down will have not only removed any potential water spots or pooling issues, but exposed stubborn contaminants as well, earmarking them as top targets for the next weapon in your detailing utility belt: The all-mighty clay bar.
STEP 6: TIME FOR A LITTLE CLAY BAR LOVE
If you haven’t used a clay bar or detailing mitt before, you’re in for a one hell of a shock. The clarity and luster they add to a surface are unparalleled, as both products serve the same purpose: Make the surface of your car smoother than Sean Connery at a swinger bar in the 1960s.
But much like popping into a swinger bar for a “buttery nipple,” or a tall serving of “sex on the beach,” clay bars are not a frequent occurrence. These contaminant removal tools typically only get whipped out for some sweet action on a annual or bi-annual basis, typically just prior to the application of a layer of ceramic coating.
Personally, we prefer a detailing mitt, like the one pictured below, as they can be used multiple times and are easily cleaned after, or during use. Clay, on the other hand, is designed to only be used once, and must be discarded if dropped on the ground. Additionally, a clay mitt fits over your hand, thus making it easier to use and hold onto. They also tend to be much larger, and can therefore cover more surface area.
Regardless of whether you opt for a detailing mitt or a clay bar, both products rely upon a lubricant to help them glide across smooth surfaces, and you should NEVER attempt to utilize one without squirting lube everywhere. Hey if it works in the swinger bar, why not in the garage, right?
Steps to clay barring or detailing a vehicle with a mitt are extremely simple, with the following four steps being the most crucial.
- Working small areas at a time, saturate the painted surface with your detailing spray or lubricant, and if using a clay mitt spraying its palm surface as well to ensure that it slides effortlessly.
- Lightly glide the clay mitt across the surface in a cross-hatch pattern. You’ll notice that there is some resistance at first, but as you continue to move the mitt around, you will notice that it becomes easier to maneuver. This is good. It means that you are removing all sorts of microscopic surface contaminants from your vehicle’s exterior.
- Once you no longer feel any snags, take a clean microfiber towel and wipe-down the area you just went over with the clay bar or mitt. Feel the surface with your finger tips, comparing this freshly scrubbed surface to an area you are about to hit with some clay. there should be a distinct difference in how slick the two surfaces feel.
- Repeat the above steps on all every portion of the automobile, working one panel or section at a time, and always keeping the surface adequately lubricated.
Quick Nerd Note: Winter sucks. Not just for us humans, but for our automobiles as well. When the roads are treated with deicing products, these chemical-rich compounds cake onto our automobiles, and over time, cause exposed metal surfaces to rust or corrode. In order to negate these risks, people scrub and spray their automobiles on a routine basis, not knowing that rubbing wintry road grime the wrong way can have catastrophic results. So to avoid having a nasty run-in with this “salty subject,” be sure to check out our article about protecting vehicles from winter’s wrath.
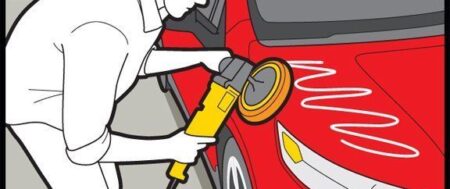
STEP 7: WHAT’S UP, BUFF STUFF?
The processes of polishing, or buffing a vehicle’s paintwork can make a huge difference in its overall appearance. That said, you will only have to polish a vehicle when it is deemed absolutely necessary, which typically is during the tail end of a detailing job, or in preparation for the application of a ceramic coating. Using a powered buffer will greatly expedite the process, with pressure being more evenly distributed than a traditional hand-polishing pad, and allows you to select a desired speed on the fly. Just be careful not to focus too intently on one area, or you may damage the vehicle’s clear coat.
HOW TO PROTECT YOUR CAR EXTERIOR
Contaminants safely removed, and all surfaces thoroughly dried and polished, it’s time to throw a little armor on that machine, at which point it behooves us to recommend going the ceramic coating route. Why? Well first of all, the level of protection a high end ceramic coating offers remains unrivalled, as is its ability to repel water, while offering years of protection. Secondly, you’ll be delighted to learn that the majority of the labor involved in the application of a ceramic coating is in the surface prep stage, a procedure that you have just completed!
So while waxes are inexpensive and easy to apply, they typically only last a few weeks before requiring reapplication, with ultra high-end products lasting as little as two to three months.
Ceramic coatings, on the other hand, offer unparalleled protection and shine on a far more permanent basis. Sure, they may require a little bit more elbow grease and time during the application process, and they do indeed cost a bit more, but when considering that they only require reapplication every 2 to 5 years, the value swings ceramic’s way every time.
Regardless of which form of surface protectant you choose, wax and ceramic coating products should only be applied to surfaces that are cool to the touch, and should be spread-on with a clean, non-abrasive cloth or pad, well away from sunlight and wind. If you’d like to know more about the importance of having the right environment for detailing and protecting a vehicle, be sure to check out our detailed guide to avoiding ceramic coating mistakes.
AUTO DETAILING MISTAKES YOU SHOULD AVOID
RAGGTOP Fabric & Vinyl Cleaner In Action Photo Credit: Wolfsteins Pro-Series/YouTube
Speaking of mistakes, there are quite a few detailing blunders one can make on cleaning day. While everyone has their own product preferences and preferred detailing techniques, the mistakes below are the most commonplace, and should be avoided entirely.
Mistake 1: Using the wrong cleaning fabric, or the same fabric for every surface. The days of scrub brushes and double-sided sponges are about as dead as the popularity of the products being pushed by that “ShamWow Guy.” Just get a microfiber mitt and some quality microfiber cloths and call us in the morning. Oh, and don’t forget to use different cleaning and drying microfiber products on various areas. The last thing you want to see on that pristinely polished clear coat is some form of nastiness from your tailpipe being smeared across its surface.
Mistake 2: Washing in direct sunlight or when the vehicle is hot.
Most detailing, aftercare, and protective products react poorly when exposed to direct sunlight or a hot body panel, so always work indoors or in the shade. This will also reduce the risk of water spotting and soap residue adhering to surfaces.
Mistake 3: Using household cleaning products or dish soap.
We know that household cleaning product is inexpensive and conveniently located in the kitchen upstairs. We also understand that you are out of detailing shampoo and need a fix fast because you’re already six beers in and can’t drive. But there’s a reason why automotive shampoo was invented, and why dish soap still has the word “dish” in it, not “car.” This shit will eat-up your clear coat faster than that Kobayashi dude at a hot dog manufacturing plant. So if you have to choose between waiting it out and detailing your ride another day, or scrubbing the entire vehicle with dish soap, you should choose the prior of the two.
Mistake 4: Using the same bucket for soap and rinsing. You should ALWAYS use two buckets when washing a car, and NEVER just one. The first should be filled with sudsy car shampoo, the other with safely sourced water for rinsing. Your dirty wash mitt or microfiber cloth should always go in the pure H20 bucket before being dipped in the soapy solution to get reduce cross-contamination.
Mistake 5: Cleaning your wheels and tires last.
When you wash a wheel or a tire, chances are you’re splashing road grime and brake dust all over the surrounding surfaces. Wash, scrub, and rinse your rollers and rubber first, and then move on to the rest of the vehicle. You can always hit them one last time with some detailing chemicals and a microfiber cloth for that finishing touch at the end of the detailing process.
PARTING SHOTS
When the detailing task is complete, and your vehicle has been meticulously scrubbed from top to bottom, you are going to do what every detailer in history has done. You are going to stand back and inspect your work. Will you be proud of all of your hours of toil? Or will you be ashamed by what has transpired? Only you have the power to turn a perfectly well thought-out detailing experience into a complete catastrophe, so play by the rules, and no one’s clear coat will get hurt.
As for the average driver, all of these aforementioned procedures, precautions, and products may seem a bit… extreme. But for those looking to fully eliminate harmful contaminants and protect their mode of transportation, there is but one option: A complete car detailing. Perhaps the daily commuter down the street was right after all, and a full detailing procedure is a bit extreme. Extremely smart, that is.
#cars #calgary #cleaning #carwash #canada #ceramiccoating #appointment #alberta #carwash
We accept the following payments Methods: Debit, Credit card, E-transfer, Cash.
Call/text us for booking:
🌐 www.macdetailz.com
🕹 4335 Manhattan Rd SE, Calgary, AB. T2G 4B1.
☎️ +14034029804